Welcome to a brand new series all about my Kitchen Garden and how to grow gorgeous, tasty, healthy, organic vegetables. It’s easier than you might imagine. Autumn and Spring are perfect times to begin a new garden. We’re starting from scratch, clearing a derelict space, making it ready for veggies! Let’s dive in!
Space: A triangular oddity
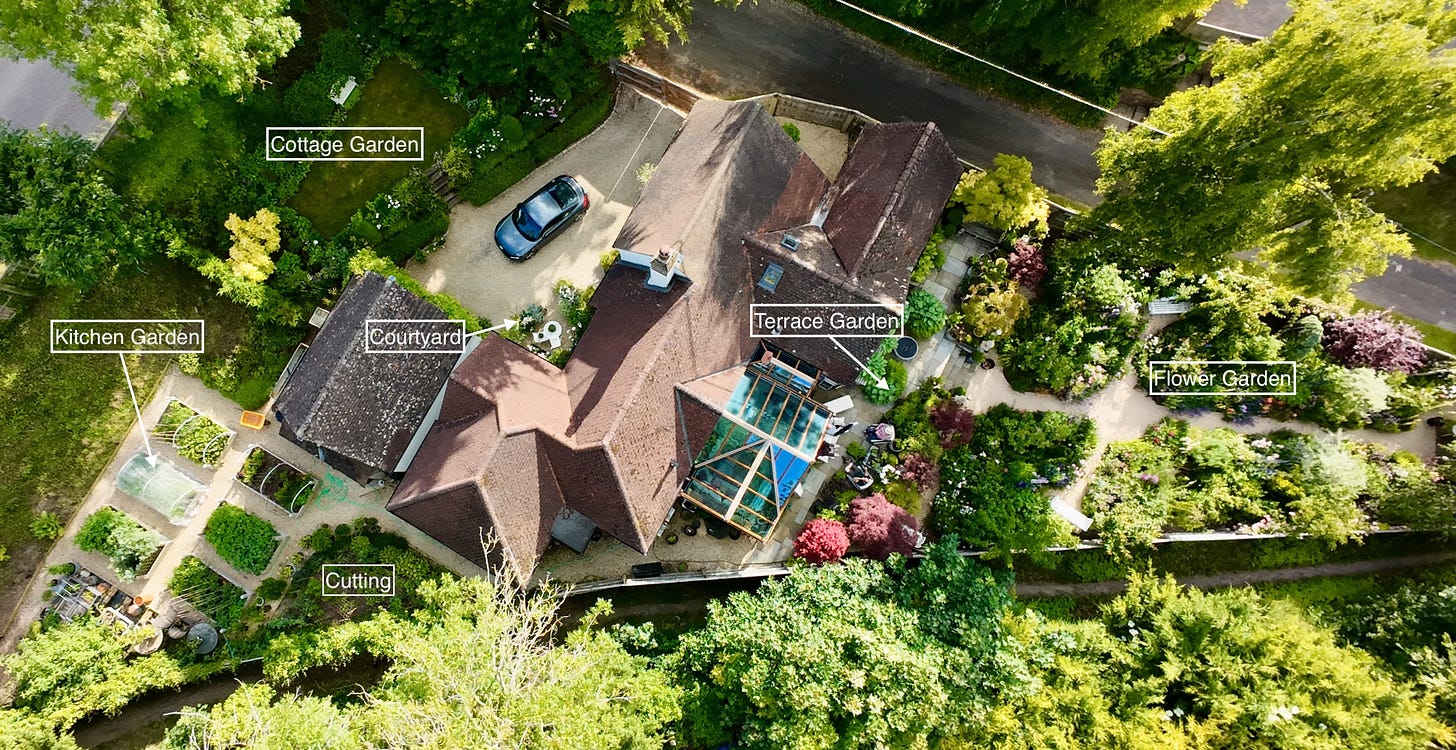
As you can see, triangles and odd-shaped spaces are not uncommon here. Pythagoras would have enjoyed it, immensely! My entire property is a right-triangle. The culmination of three cottage plots, long ago amalgamated into one. The 17th century cottage is sited right in the middle, with the gardens wrapping round in a C-shape on the north, east, and south sides. The Flower Garden forms another triangle to the north. Facing east, around the side of the rambling cottage, is another more peculiar triangle.
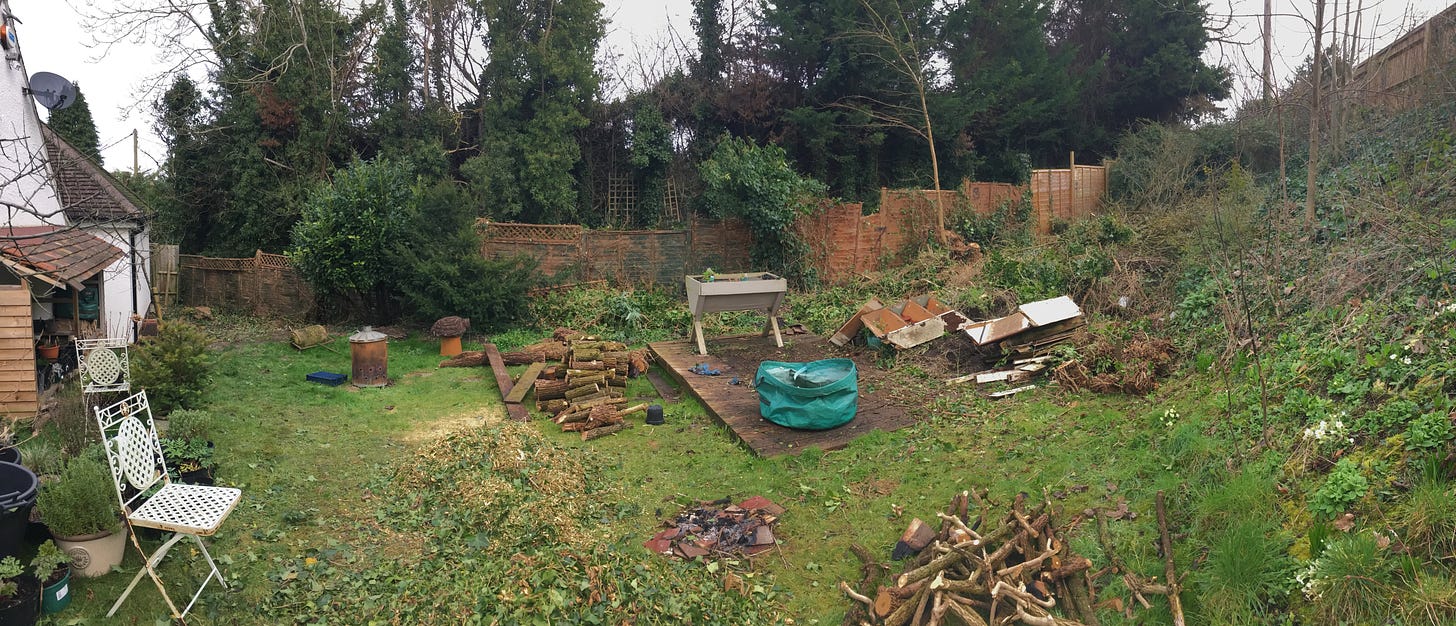
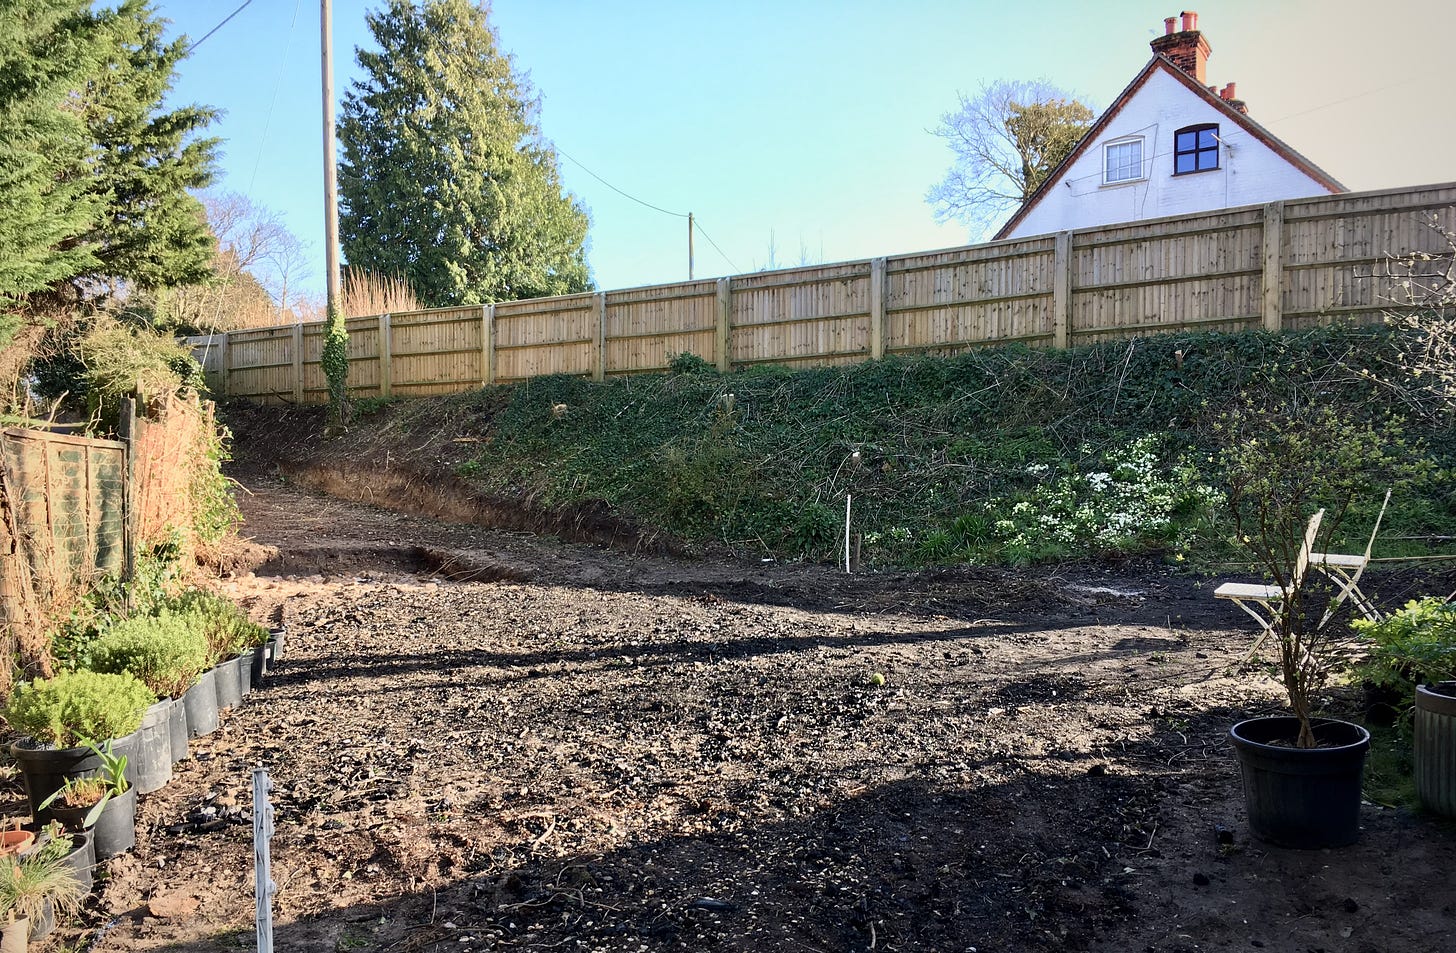
Until a few years ago, this particular triangle was more or less derelict, earmarked for a few vegetable beds. In its current state, little more than a demoralising mess. Reminiscent of those horror show allotment plots, neglected for decades, shoulder-deep in pervasive weeds, the inexplicable toilet, sheets of glazing, and years of accrued rubbish.
Allow me to set the scene…
To get into the space, you walked over ankle spraining chunks of green and purple slate, balding in patches, exposing half-buried disintegrating weed fabric. This expletive-inducing path led to a row of broken concrete roofing tiles and paving slabs, both used as lawn edging.
Stepping up onto the patch of moss ’n' weed and looking right, you would see the back of the double garage. Between the retaining wall for ‘raised’ garden and lower level garage, you would spot the potentially lethal and completely absurd drop - a gap nearly 2m deep and shoulder width apart, the bottom strewn with bottles, bricks, and asbestos tiles. Oh and several brambles for good measure.
Looking to the left, more roofing tiles edged a sorry-looking border, swamped by a massive laurel, a spindly yew, a half-dead maple, and an entirely dead elm. Behind the monster laurel, a rickety ship-lap fence groaning and creaking under a wall of ivy. In the centre of the ‘grass’ lay a rotten timber deck where a summerhouse once stood. Just beyond this, a high thicket of privet, brambles and nettles, with ivy-clad dead elms and elders.
Taking those first steps
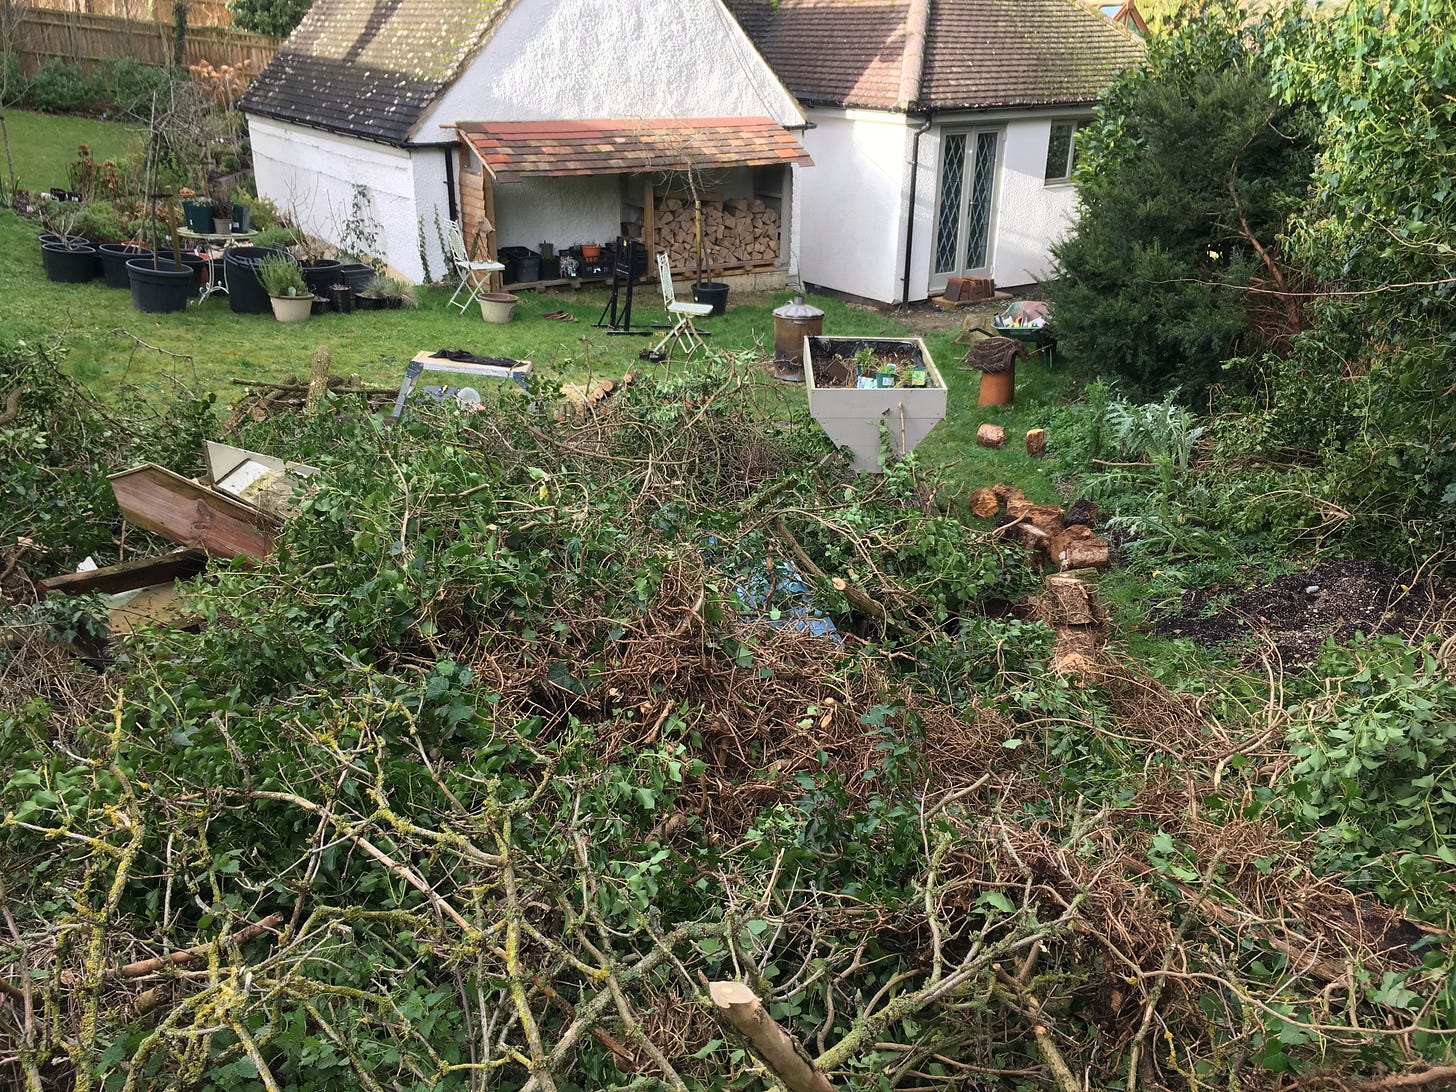
It was February when I ploughed head-first into the high thicket. I took a chainsaw to pretty much everything standing. Not quite on the same level as old Leatherface from Texas, but close. The trees were mostly all dead and rotten, held together by moss, ivy, and a woodlouse Megatropolis.
Bizarrely, what I thought was the boundary, was actually just a wall of gnarly privet. As I hacked my through, Indiana Jones style, I found another 20m of garden! The tip of the triangle, as it were. Lying in wait, a monstrous bramble! A briar worthy of Maleficent herself, with thorny trunks broader than my booted ankles. I also found a mountain of garbage and garden refuse from the previous owners. Plus a cache of beer cans and bottom-shelf whiskey bottles, all very kindly donated by passersby.
As I cut, slashed, and sawed my way round, I amassed an intimidating mountain of my own: Dead trees felled (some logged for firewood), rubbish, chopped brush, rubbish, stumps and roots, rubbish, old decking and fence panels, more rubbish. Thankfully, I knew a guy, who knew a guy… and that guy was called Kevin.
This highly-skilled groundwork contractor, arrived with a mini digger and swiftly cleared the ground, garbage mountain and all. I was rather entranced watching him as he methodically levelled and smoothed out the lumps and bumps, as easily as spreading warm butter on toast.
All that remained was a section of stairs (don’t ask), two decaying tree stumps, and bundles of ivy, piled onto a welcoming bonfire. I grabbed some chairs and we all enjoyed the heart-warming, limb-thawing glow, with a well-earned brew.
The next day, standing silent, looking at a completely empty space, I suddenly realised how daunting it was! More worrying, I knew absolutely nothing about growing vegetables. “How hard can it be?” I thought. “They’re just plants and I can grow plants just fine!” I thought. “How hard can it be?!” Ever the optimist…
Spacial awareness
First things first… How to use this north-facing, sloping, triangular space? The previous year, with the veg garden in mind, I had used an app (PhotoPills) to track the path of the sun. So, despite the aspect, a high embankment on the southern side, and a nearby mature ash tree, I knew there should be enough light for veggies, more than six hours of direct sun anyway.
The 1:6 gradient, rolling along and across the site, required a little more thought. To make watering easier, I would need to engineer terracing, rows, or beds. I settled on raised beds. Without levelling the growing area, water would simply run off the beds and away down the slope, leading to one extremely irritated gardener. It’s okay to make life easier now and again!
Growing mostly low, mixed vegetables meant that orientation (to the sun) wasn’t critical but I decided on orientating the beds north-south, rather than east-west. Any taller crops would be grown towards the bottom end of the beds, which would also have the deepest soil. Makes sense.
What about size? With a little research, it quickly dawned on me that gardeners can be a finicky and highly pernickety bunch. There was plenty of debate on ‘ideals’ and ‘optimals’ floating about. However, the general consensus for width is a magical 1.2m (4ft). With that width you can access the middle of a bed, from either side, without having to step on the soil and ‘risk compaction.’ That makes sense too. Mostly…
While delving into ideal row widths, I found the GrowVeg Garden Planner app. Such a useful tool! Highly recommended! With trusty tape measure in hand, I plotted the entire space, edge-to-edge, and to scale. Then, recreating the space in the app, I could experiment with layouts, resize growing areas, move paths, play Tetris with beds, reposition anything to get the most from the space.
Good access is essential. I needed to be able to go through or around the beds, to reach the compost bays beyond - while pushing a fully-laden wheelbarrow uphill. Looking to the future, I knew at some point there would be a greenhouse, so I allocated a sunny area for that. More than likely there would be a cutting garden too, so I set aside a space for that.
Thankfully, while fussing over the layout, it occurred to me that the height of the raised beds would pose a sharply-cornered obstacle for my faithful wheelbarrow. Because of the slope, the ‘lower’ portion of any raised bed would be nearly as high as the handles. Not wishing to my scrape knuckles on timber posts, I needed to allow for the full width of a wheelbarrow, when spacing the paths and beds.
Putting all this together on the planner, I calculated that the universally recommended 1.2m (4ft) width would actually give me less growing space, after accounting for the wider paths that needed to be about 80cm. That is unless the rows spanned the full width of the space, which wasn’t practical at all.
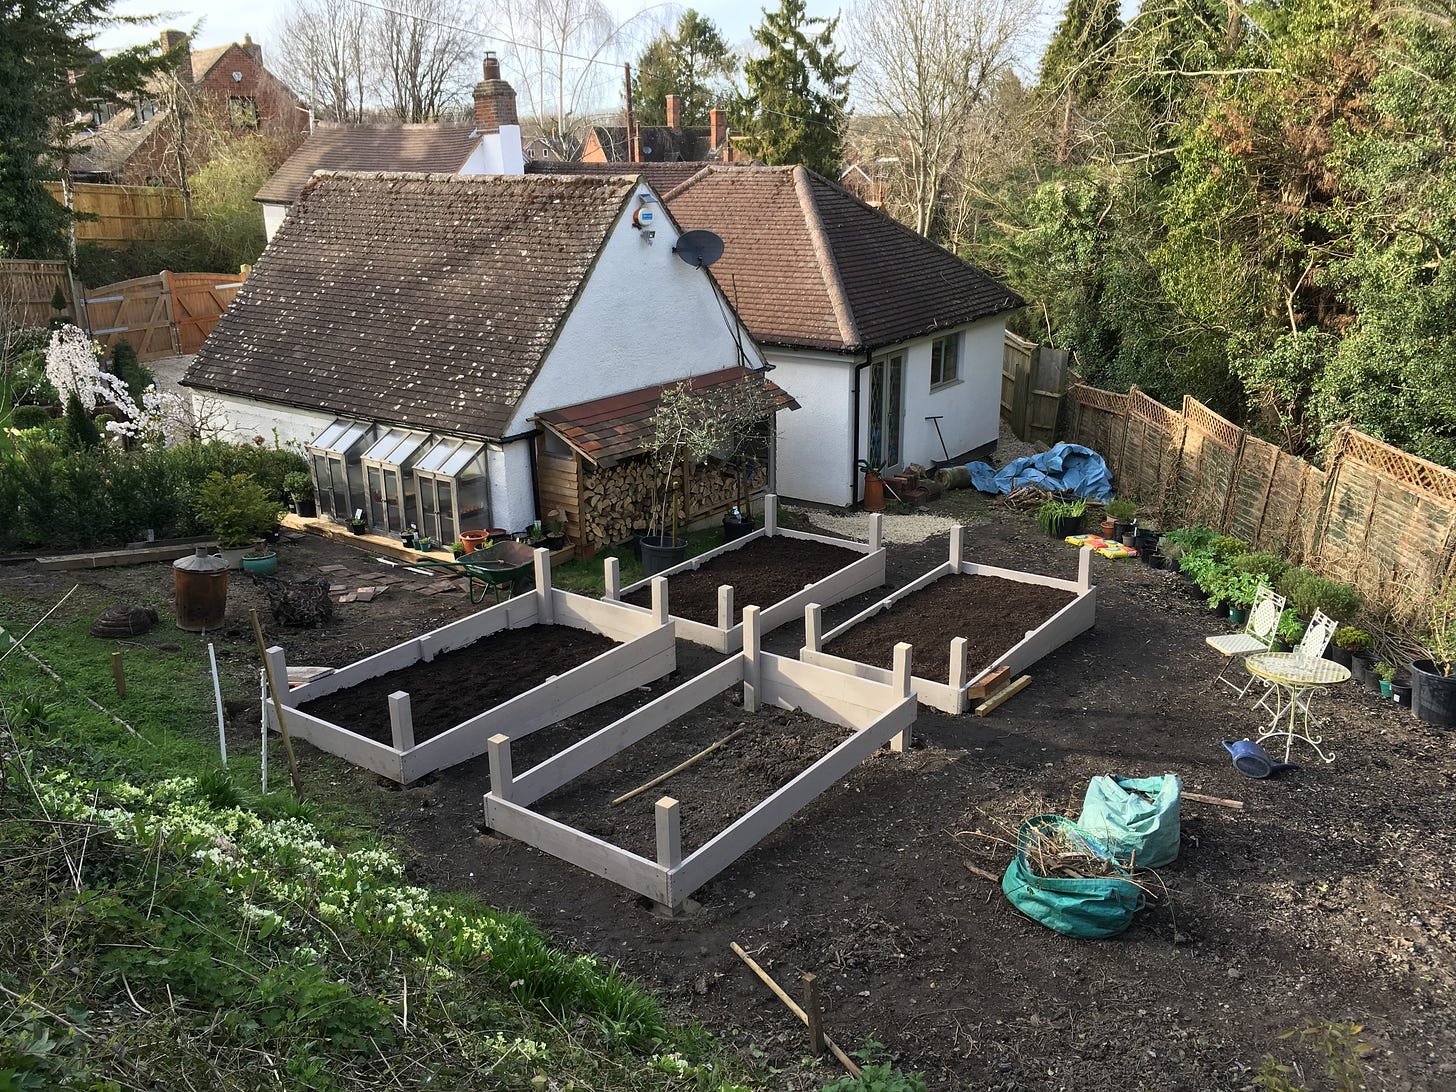
Eventually, after plenty of faffing, I arrived at a good compromise. The beds would be a touch wider at 1.5m (5ft) wide but only 3m (10ft) long. The extra width was not an issue as they’re raised up and I was planning to use the no-dig method.
(No Dig: Undisturbed soil and compost as a surface layer. The compost has an open and springy structure, so you can walk on the beds without damaging soil structure, i.e. compaction)
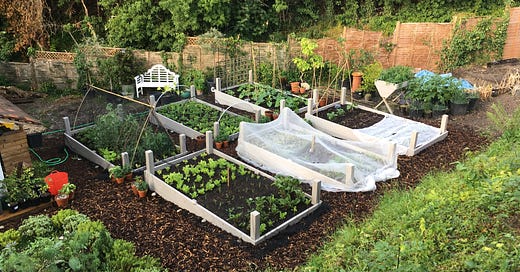
Finalising the plan, there would be a total of six substantial beds, giving me 27m² (290ft²) of growing space. More than enough for two hungry foodies! As most timber is available in 3m lengths, this also made efficient use of materials and less cutting! Win! Win! The simple grid layout allowed for paths around and in-between all the beds, all wide enough for a wheelbarrow. There’d also be a wider main path around to the compost bays and a direct path into a future greenhouse. Ta Da!
Raw materials
What should I use to build my new beds? There was good’ol corrugated metal. Yes, it would eventually rust through, but it’s cheap and fairly easy to replace, although I didn’t fancy cutting it with an angle-grinder. At the other end of the cost spectrum, there’s the ridiculously priced, flat-packed, poly-something plastic ‘kits’. I’m generally suspicious of anything plastic that will be baked by the sun year on year.
Traditional potager-style hazel hurdles look extremely pretty, but just don’t last and, being truthful to myself, (because you really must) I knew the likelihood of me replacing them, promptly, each season would be remote! So, I settled on trusty timber boards. Timber is relatively cheap and any boards that eventually rot through can be easily replaced with the turn of a screw. That’s settled then!
The best value (at the time) was untreated scaffold boards. The metal end bands would also be useful protection against my clumsy wayward ‘barrowing. I have been known to carelessly barge through now and again! I would have preferred cedar boards, but cedar is very expensive in the UK. Maybe a future upgrade?
Every ‘material’ option had to be tempered by these factors… This is a new venture… Could it really be that successful? What if I hated it? What if it was too much work? What if all I like to eat is potatoes?!
All together now
With the GrowVeg Planner design printed out, already grubby and folded in my pocket, I took measurements off the garage wall to triangulate the lines and positions of the beds. It was a blank space after all and I needed a fixed point to measure from. The 3m x 1.5m beds were marked-out with builders lines, allowing for the 80cm paths in between. It was tedious and time consuming, but so worth it. Especially for a pernickety fusspot like me!
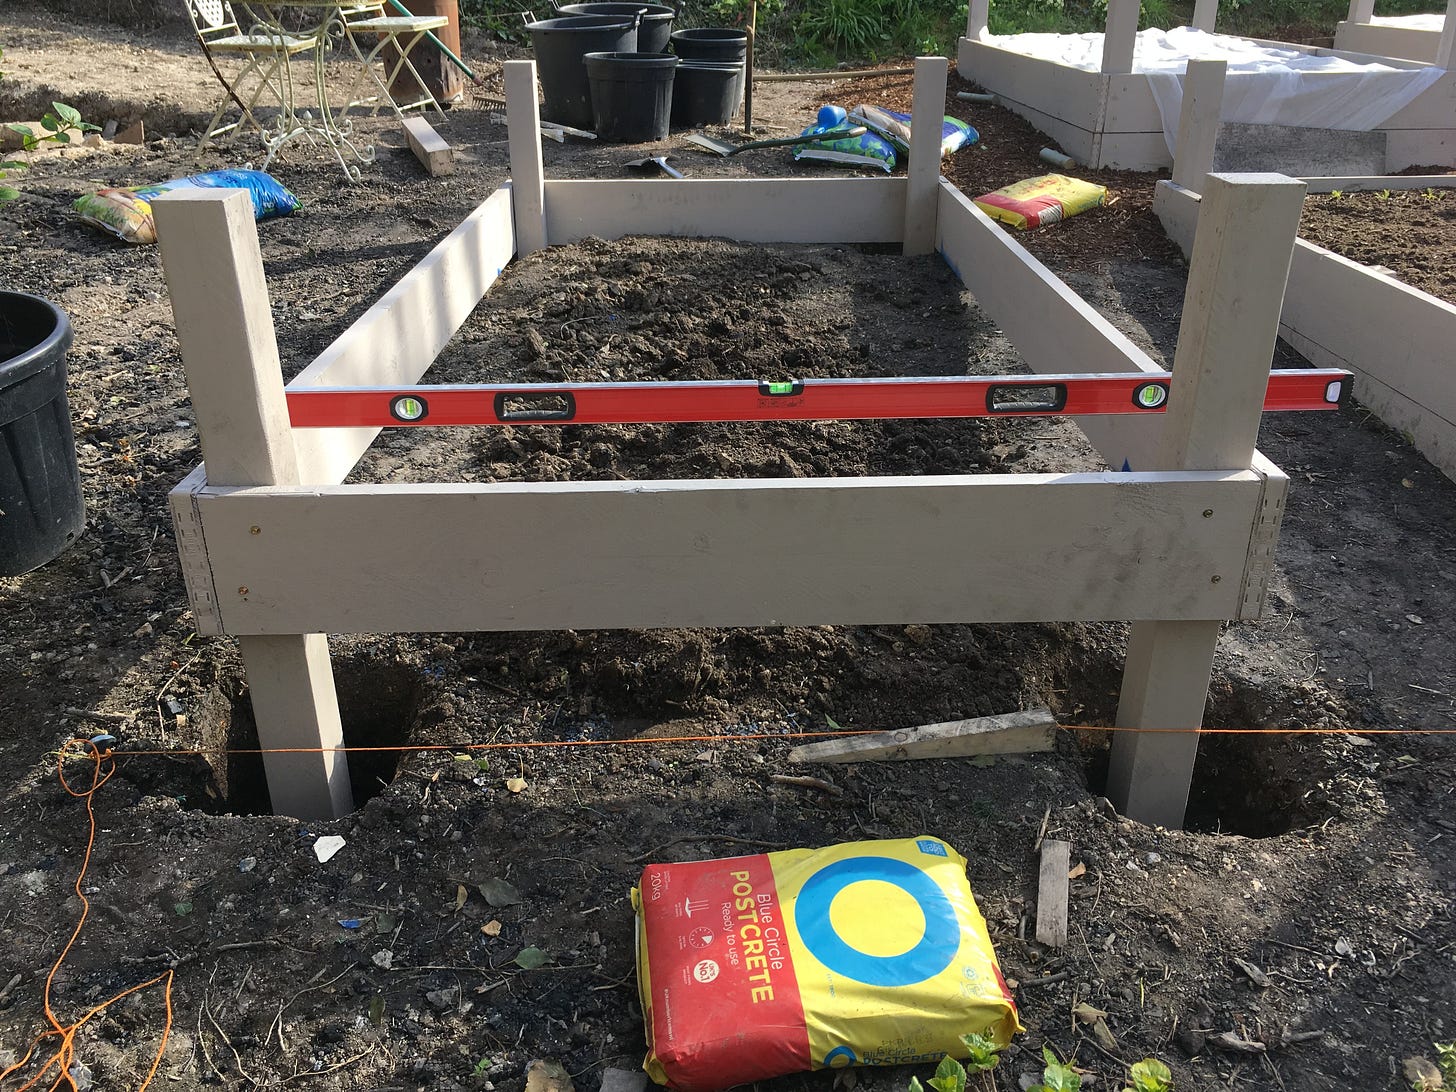
At each corner of the grid, 30cm (1ft) deep holes were dug for the timber posts. The posts, already cut to size, were very carefully aligned and concreted into position. Postcrete is amazing stuff! Simple to use and sets like rock in just 10mins.
While the postcrete was setting, the boards were screwed together. I used a builder’s square and level to ensure the boards were accurately aligned. When all the posts were set, the ‘case’ was brought through and lowered over. There, it was propped-up, meticulously levelled across both planes, and then screwed into place with extra beefy coach screws. Lastly, the lower ‘sloping’ boards were cut to size and fitted. I also added supporting struts to reinforce the long-sides.
Fill ‘em up!
With the first beds built and in position, looking crisp and square, attention turned to the filling… The growing medium. I loosely calculated the volume required to fill each bed. Keeping things simple, I ordered several tonnes of peat-free multi-purpose compost, swiftly delivered and lined up in giant dumpy bags. I allowed 10% extra for firming down.
Filling the beds was knackering, barrowing to and fro, but relatively straightforward. The remains of that old mossy lawn had been scraped up into rough turfs and piled. I laid these moss-side down inside the raised beds. Then we carted through tonnes of peat-free multi-purpose compost to fill the beds.
The compost was very dry and fluffy, so each layer was firmed down by repeatedly walking over it and healing it in. Compost has a completely different structure to soil, so walking over it, or even healing it in, does not compact it. In hindsight I could have just spent a while watering it, to settle it down… oh well!
A path well trodden
As the beds slowly filled, the ground in between was compacted and smoothed by thousands of footsteps and squeaky barrow wheels. It obviously begged the question: What material will I use for the paths?
Brick pavers look beautiful, especially in basket weave or herringbone designs. I’ve long admired Monty Don’s garden paths! But the price of those bricks and the time and cost of laying them properly? A compromise would be to have a narrower width of bricks, enough for the barrow wheel, with grass either side.
Or perhaps all grass paths? But what about the slope, the winter weather, the permanent winter shade? What about mowing and weeds? Besides, it needs to be accessible and practical in all seasons. Gravel is durable and far cheaper than bricks and very easily applied with barrow and rake. Woodchip is cheaper still…
In the end, I settled on wood chippings, again ordered in bulk.
convinced me of woodchip’s many virtues. In the beginning, it all looked very smart, yet retained that cottagy potager feel with surprising heritage. Wood chip is highly beneficial too, feeding the soil biome as it decomposes.Although I often found slugs hiding under the larger pieces of bark, I also found mollusc munching ground beetles hunting them too. Woodchip is a cheap material with many benefits, so I still recommend it. Especially if you’re starting out like I was. Opt for finer bark chippings if you can, but do replenish the paths every couple of years. You could also contact local tree surgeons that may even give you a truck load of fresh ‘green’ wood-chip for free!
The proof is in the eating
From ground clearance to the first harvest was just ten weeks. I could not believe just how well it went. Honestly! Most of my projects are beset by delays and unwelcome surprises. It’s part and parcel of owning a 350 year old cottage.
Stood there in the May sunshine eating my first radish, fresh-picked rocket leaf, nibbling a young carrot, or podding my first pea… It was simply astonishing. A wonderful experience. Unforgettable! For the first time in a very long time I genuinely felt a sense of pride. Together, myself, my partner, my father, and Kevin (the star), had completely and utterly transformed this space.
To get ahead in that first growing season, before we had even began clearing, I had already sown my crops under cover. As I said, ever the optimist! I used various seed trays and module trays to grow strong young plants, under the protection of the conservatory, ready to plant out as soon as the first beds were filled. Here’s the actual timeline:
21st February - Sow frost-hardy crops
28th February - Attack the thicket
7th March - Ground clearance begins
13th March - First raised bed constructed
23rd March - Four raised beds constructed and filled
24th March - First crops planted
14th May - First harvests!!!
25th May - Final two raised beds constructed and filled
It wasn’t all plain sailing though. Gardening never is! In the coming years, I learned valuable lessons, quickly. Learning the idiosyncrasies of the space, soil, light, pests and diseases, and the needs of innumerable crops. Finally comprehending the value of planning! Enhancing the space for both humans and pollinators with companion plantings. Extending boundaries to include a no-dig cutting garden.
Most of all, learning to work in harmony with the seasons, the climate, and nature. Enjoying the moment. Revelling in the flavours and choice of freshly harvested vegetables. All the while, remembering that this odd little triangle was nothing more than a patch of weeds, a rotten deck, and a thicket.
Coming up…
Learn from my mistakes! A whole raft of lessons, thankfully learned very quickly. We’ll revisit the ‘build’ and see what, if anything, I would do differently. We’ll take a look at compost and watering those veggies. Speaking of which, we’ll dive into vegetables themselves, which ones I grow, the ones I’ve consigned to the bin, and quantities. How the light affects growth and how I protect my organic vegetables from problem pests and adverse weather.




Thanks, really nejoyed this and lots to learn from it, too
What a transformation, very impressive and just how quickly you were harvesting is fantastic.